

Retro Quill Stem Road Bike
In this article, I'1000 talking about using very old, or vintage, frames for assembling bicycles that are relatively cheap to put together, and adequately simple and inexpensive to maintain (service).
At the end of this article, there's a video where I demonstrate most things mentioned here.
Table Of Contents (T.O.C.):
- Why would anyone use a vintage frame?
- Potential bargain breakers
- Bottom bracket
- The distance between the rear wheel dropouts
4.1. Cold-setting the dropout width - Threaded forks
5.i. Front wheel dropout width - Quill stems
- Down tube friction shifters
- Rear derailleur hanger
- Conclusion – is information technology worth restoring an old wheel?
- Video demonstration of this story
1. Why would anyone employ a vintage frame?
I thought you'd never ask! 🙂
There are several reasons. Permit'due south dive in:
- Huge supply, oftentimes very cheaply, or even for free (all-time things in life are free).
- They are often durable and reliable.
- They don't neglect suddenly and completely, without whatever prior warning, similar the modern carbon-fiber frames and forks.
- Putting an old frame back in service instead of building a new one is environmentally friendly.
- They're damn cool looking! 🙂
Information technology's a expert construction for edifice a cheap, reliable bicycle that'south easy to maintain – and then y'all don't take to await for weeks during the seasonal bicycle repair shop overload.
What near the potential complications, gotchas, and caveats? Read on.

– T.O.C. –
2. Potential deal breakers
When considering a vintage bicycle restoration, the fist thing I check is whether everything can be removed from the frame.
To be more precise, the sentence above could exist phrased similar: "I cheque if everything can be removed with an adequate amount of time and effort." Sure – with some chemistry and summit-class tools annihilation can be done, but I don't always feel like spending tens of hours just to brand a frame functional. For the things that have a sentimental value, not measured in time and coin, I'll dedicate separate articles.
Here'due south a brusque list of the potential party-stoppers:
- Cracked frame, or dented tubes. Whatever of those generally leads to a full failure sooner, or after (why are dented bike frame tubes weak).
- The seat post tin can go stuck. This means you won't be able to adjust the saddle height, or change the seat postal service in example it gets damaged (the saddle mounting mechanism is what sometimes gets damaged).
- Stuck bottom bracket cups, or BB cartridge. They become worn over fourth dimension, develop play, and if they can't be removed and replaced, information technology makes the frame have a very limited "best-before" appointment.
- The bottom bracket beat standard is not British, or at least Italian (come across threaded bottom subclass standards).
If all that is proficient, yous're in luck. Only – whatever you mount on the frame, make sure to apply an advisable mounting (anti-seize) paste, so nothing gets stuck so it can't be removed and replaced later on.
Now allow's see well-nigh the of import things to consider:
– T.O.C. –
3. Bottom bracket
Old frames come with all sorts of bottom bracket standards. In a separate article, I explained and provided the dimensions for diverse threaded bottom bracket standards. The well-nigh commonly seen are British ("BSA"), and Italian threaded standards – but it's not unlikely you will come across something more "exotic."
Today, spare bottom brackets tin easily exist institute for the British (BSA) standard, and with a flake more hassle yous could too source the Italian standard ones. The rest are a lot more difficult to come up by, so I would avoid frames with "exotic" bottom bracket standards.
How can yous decide which standard is on the frame? It's best to remove the bottom bracket cups (or cartridge), take a look and measure.
If there aren't any threads, it's an obsolete press-fit standard. To set it you lot need a donor BB, cut and machined out of a frame with a British standard threaded bottom bracket. Then whacked into the frame, after a few hours in the freezer. That'southward a chip of a hassle.
If it has threads, measure them. The left cup is always unscrewed anti-clockwise (it has the standard, correct-handed thread). Once y'all've removed it, you can measure the diameter, either on the cup, or on the frame:
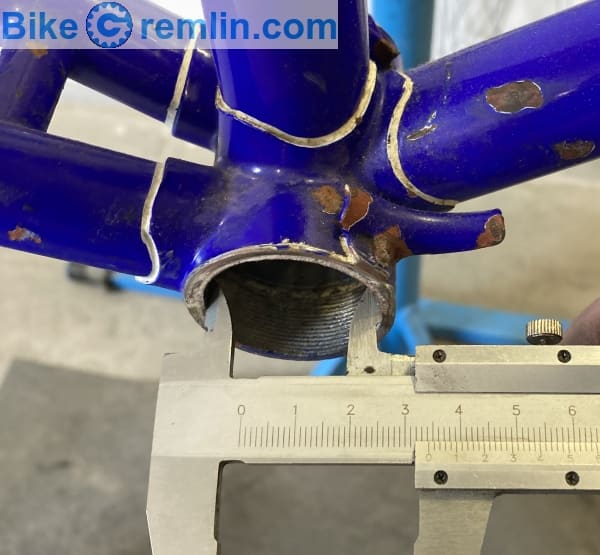
Picture 1
If the diameter is over 35 mm, and so it's an Italian standard BB, so the correct mitt side loving cup is unscrewed counter-clockwise (i.eastward. to the left).
If the diameter is under 35 mm, as shown in moving picture ane, then information technology could be British standard. In that case, the right-hand side loving cup is unscrewed clockwise (it has a left-handed thread). However, if yous have really bad luck, the frame might have a French standard bottom bracket, in which example turning the correct loving cup clockwise volition just farther tighten it (every bit is the instance with the frame in picture 1)! That'south tricky because the diameter is the same, and the thread pitch is very like.
If you are trying to turn it clockwise and it won't burl: are you lot turning information technology the wrong way, or merely dealing with a stuck (seized) cup? We don't know. Try to find more than info on the frame, or see if in that location's some description printed (or stamped) on the cups.
Yous tin besides measure the frame'due south lesser subclass beat out width. Italian standard ones are seventy mm broad. The others are 68 mm wide – with an exception that British standard ones can as well be 73 mm broad, or wider (in addition to the common 68 mm). So if a BB vanquish is wider than 68 mm, information technology's definitely non a French standard ane.
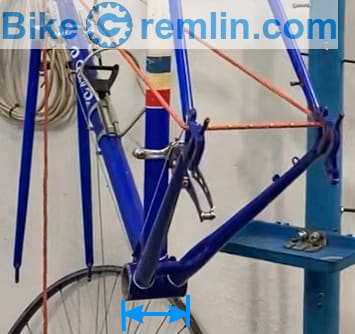
Pic 2
Once y'all've removed the cups and confirmed the frame's BB standard, you can detect replacement British, and Italian standard cups for both square taper, and the modern, Hollowtech Two cranks:
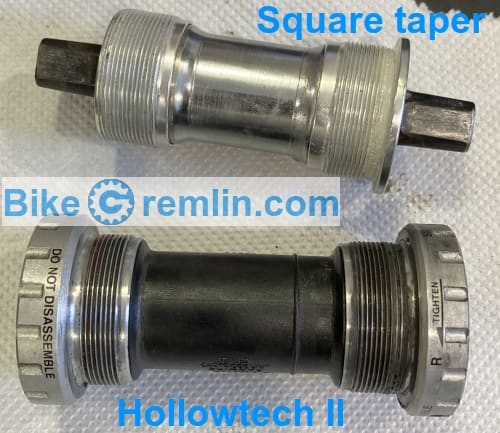
Picture show iii
– T.O.C. –
four. The altitude between the rear bike dropouts
Modern rear hubs are readily bachelor in 130 mm Old ("width") spacing for road, and 135 mm for MTB hubs (bicycle rear hub OLD width standards).
Vintage frame rear bike dropout spacing is often 126 mm, or less.
The acceptable difference between dropout width and hub'southward One-time is two.5 mm. Anything more than that leads to frame harm – even if a bicycle can be squeezed in. I repeat: dropouts that are up to 2.v mm wider, or narrower than the hub's OLD are perfectly fine, simply anything more that is risky.
– T.O.C. –
four.1. Cold-setting the dropout width
Fortunately, steel frame dropouts can be widened (or narrowed down for that matter) with no special tools required.
Note: aluminium or carbon frames will be damaged if yous try to widen their dropouts! Titanium? I wait it to exist a lot more hassle (for reasons beyond this article's telescopic), but theoretically possible (I've never tried information technology).
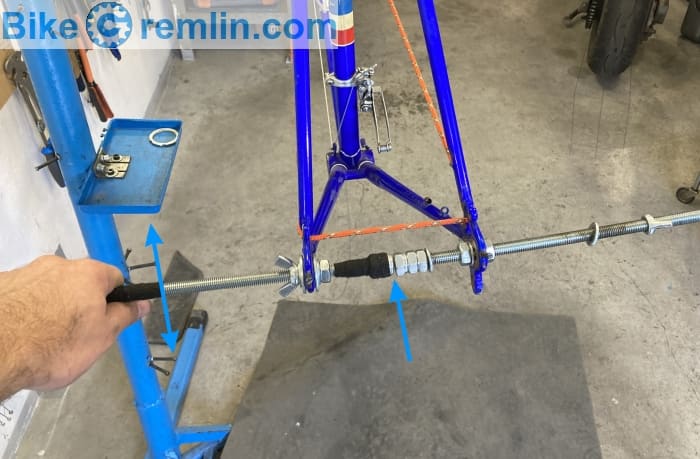
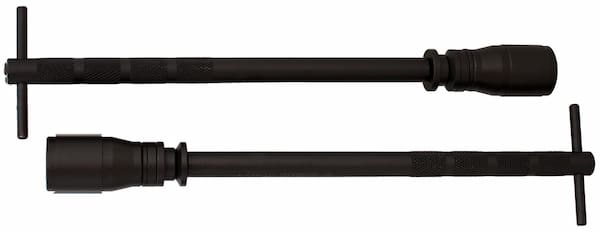
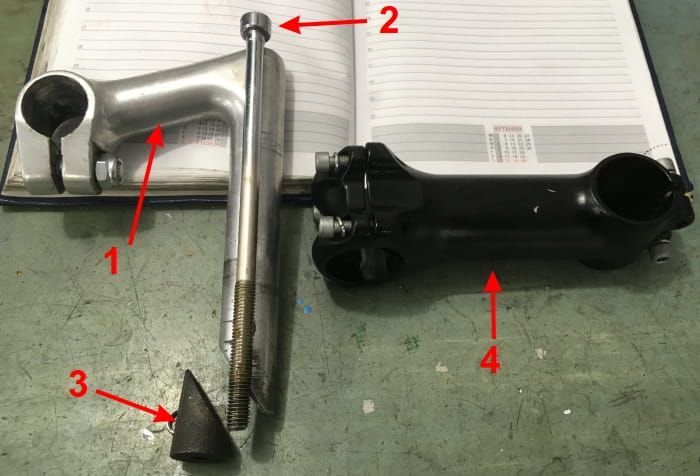
This can be done using some improvised tools: a 30+ cm long threaded rod, 10 mm wide, some nuts, and washers:
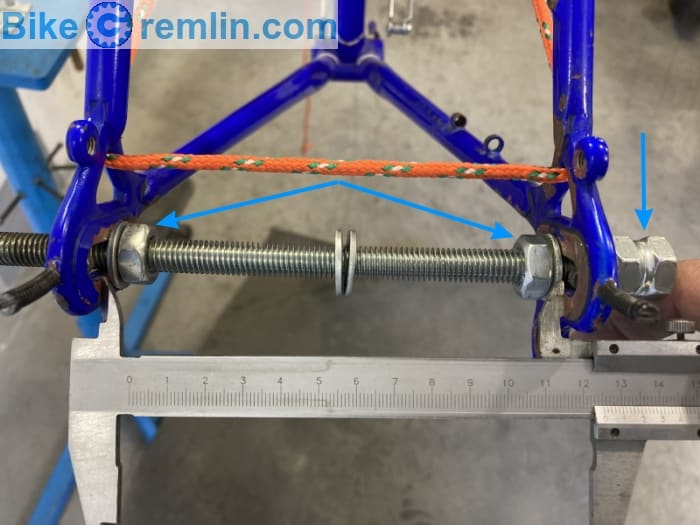
Flick 4
Thread two, or 3 nuts on one end, and tighten them against each other (similar lock-nuts) – then y'all can concur that side more than easily in place. Then but move one nut and washer to that side, to lean on the frame, and use a wrench to turn the nut on the opposite side, spreading the frame.
Lubricate the threads, especially if the frame has very thick and strong tubes.
Considering steel is flexible, you'll accept to plough that nut until the frame is spread to nigh 150 mm, or more than – then that, when you lot unscrew the nut, and the frame springs back to a sure caste, it ends up at about 130 mm width (if that's what you're aiming for). Basically, it'due south a chip of a trial and fault – you lot could commencement with 145 mm, then get with 5 mm increments, checking afterwards each spread, to run into at which width the frame springs back.
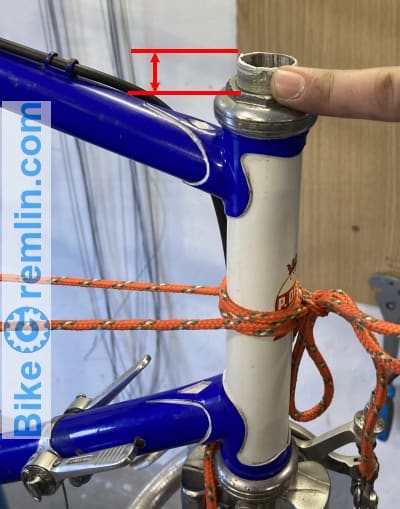
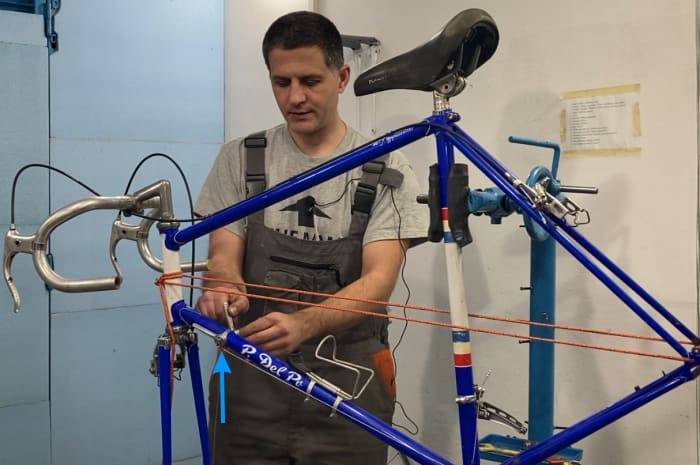
Before doing that, check the frame's alignment. This can be done by threading a string through the rear dropouts, and over the head tube, and so measuring the distance between the cord and the seat tube:
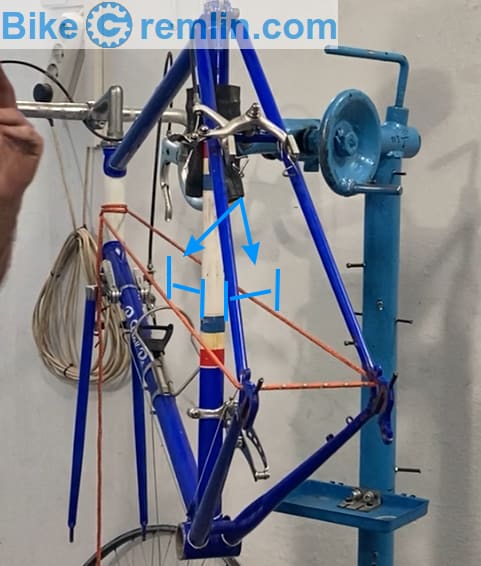
Motion-picture show 5
If the distance is the same on the right, and the left paw side, so it's all good. If information technology isn't then you need to spread the side that is nearer, to make them even, centered:
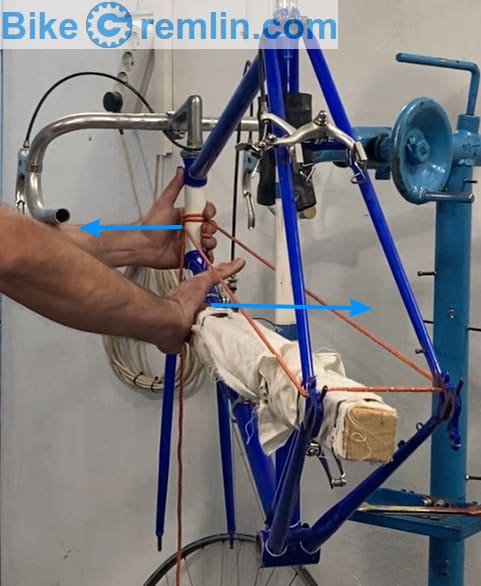
Picture 6
All you lot need is a lever – preferably coated with some cloth, to avert damaging the frame.
Archimedes
Y'all could use the similar principle to make the frame narrower, if that's what you're aiming for:
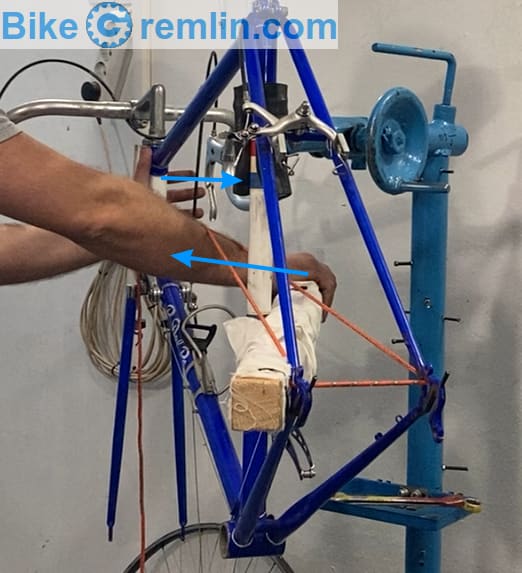
Picture show 7
After decades of consoling myself, attempting this procedure has proven beyond whatever reasonable uncertainty that thickness and length do matter, regardless of all the stamina, skill and technique. 🙂
If you spread the rear dropouts to 132.5 mm, you'll be able to use both route hubs (130 mm wide), and MTB hubs (135 mm wide).
After spreading the frame, the final pace is making certain the dropouts are paralle to each other, and aligning them if needed:
Picture 8
Depending on the exact point at which you are measuring the dropout width, adjustment the dropouts later having spread them could reduce the spacing past a few mm. Double check.
Here's what Unior's dropout alignment tools expect similar (Amazon affiliate link):
(Amazon affiliate link)
Picture 9
– T.O.C. –
5. Threaded forks
A great majority of vintage frames (as well as the new frames on budget bicycles) have a threaded fork, with a quill stem.
In a split article I showed and explained threaded and threadless forks.
Briefly: setting the optimal headset bearings preload (and so at that place is no play, but it's non overtightened) is a lot more difficult with threaded forks. They are held in place by a nut, which is held in place with a lock-nut. 🙂 As you starting time tightening the locknut, property the nut in identify, the nut turns a bit, so you need to make several trial-and-error attempts to get it just correct. Can be a chip frustrating.
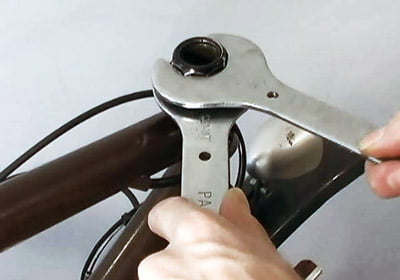
Source: bicycletutor.com
Picture x
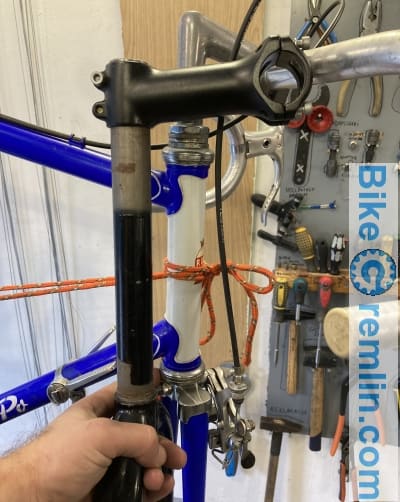
With threaded forks this is a lot simpler:
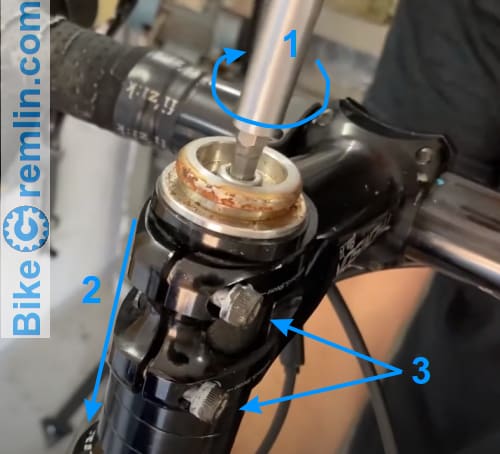
By tightening the top-cap commodities (1), preload is increased (ii)
After it's set, tighten the sem in place using its pinch-bolts (iii)
Movie 11
Tin a threadless fork be mounted on a vintage frame?
These frames unremarkably have a caput-tube for forks with a 1″ steerer tube diameter. Matching headset cups aren't broad-spread, merely can exist sourced. Just 1″ threadless forks are difficult to find.
What tin be washed is finding a threaded steel fork, with a steerer tube long plenty for the threadless stem to be mounted on it. It's worked for me – steel steerer tubes are stiff enough to survive such improvisation, in spite of having threads cut into them (which does weaken them to a caste). Just make sure to use an aluminium stalk – steel ones are too difficult, while carbon fiber ones could get damaged when tightened on a threaded steerer tube.
Picture 12
Good length, merely the steering tube is too thick (1 1/8″, i.e. 28.vi mm):
Moving-picture show 13
Is this actually necessary? Why should I bother with this? I'm explaining that in the next chapter:
– T.O.C. –
five.ane. Front wheel dropout width
Bicycles from the by 30 years rarely have this problem, but with bicycles that are older than that, you may come beyond it. Mod front end hubs are designed for 100 mm broad dropouts (some mod "thru-axle" hubs are designed for 110 mm). However, on bicycles that are 50+ years one-time, you can ofttimes come beyond 90 mm broad front bike dropouts.
Some modern hubs let you to utilise thinner (narrower) locknuts in guild to reduce the full width. This is a hack, not a design characteristic, but it can work, depending on how narrow locknuts you take at hand and how the hub was designed (if the original locknuts were broad enough to make a difference of at least vii mm less).
Another selection is to endeavor spreading (cold-setting) the fork legs. Hither, the issues can arise:
- If one fork leg goes further to the side than the other, it will negativelly impact steering.
- Too, if one fork leg is every bit much every bit 1 mm more than towards the front, or the rear, it will brand the wheel sit down at an bending and also negatively affect steering.
It is very tricky to align fork legs using domicile DIY tools.
Unless saving all the original parts is of great importance, it'due south worth giving it a shot and, if the steering is off, consider finding a fork with 100 mm wide dropouts.
Video on fork dropout width:
– T.O.C. –
half dozen. Quill stems
Quill stems are practically a standard on near sometime, or modernistic low-finish, or "retro – vintage" frames. They are an inherently dangerous patent! I wrote about it in the dangerous and bad cycling industry patents commodity. Briefly:
Quill stems are held in place via only one bolt, that can break suddenly, without whatever prior alert. Yet information technology is highly impractical taking information technology out for inspection each day. When the bolt breaks, you lose control over the steering – i.e. turning the bars won't touch on the front wheel.
Good quality threadless (alee) stems don't take these problems – they are secured via two bolts. It is extremely unlikely for both bolts to neglect at the aforementioned time.
Picture xiv
When I say this, in that location's ever that one guy who says something like: "I've been riding a bike like that for years. Thousands of people ride quill-stem bikes every day."
That is perfectly true. However, information technology is also perfectly true that the bolt can snap without any prior warning. I've had that happen, and accept seen bikes with that problem in my garage over the years.
You lot must determine whether this is an adequate risk for you. If information technology isn't, you tin see some solutions in the previous, fifth chapter of this commodity.
– T.O.C. –
seven. Down tube friction shifters
Friction shifters don't have pre-set clicks, but are merely moved until the derailleur moves the chain over to the adjacent chainring, i.east. changes the gear. They are very durable and robust but do require a chip more than concentration when shifting.
On retro road-wheel frames, they are usually on the down tube:
15
Some people notice the down tube shifter position to be impractical, forcing them to take a hand off the bars in club to shift. This tin exist "fixed" by mounting housing stops instead of the down tube shifters. You tin so mountain the shifters of choice on the bars, and guide the shifter cable housing to the housing stops on the downtube.
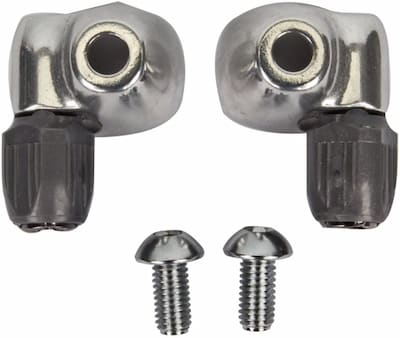
(Amazon affiliate link)
Movie sixteen
– T.O.C. –
8. Rear derailleur hanger
Some onetime frames accept no rear derailleur hanger, or they do, merely information technology'due south damaged beyond straightening and repair.
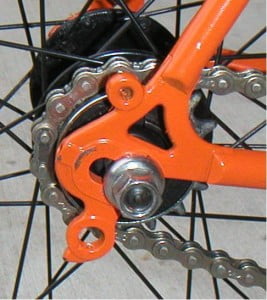
Picture 17
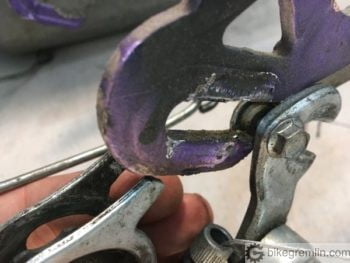
Picture xviii
If you wish to install a more modern direct-mount rear derailleur on a frame without a hanger, you'll demand a rear derailleur hanger adapter:
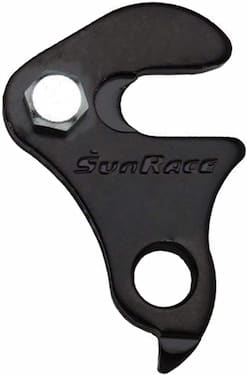
(Amazon affiliate link)
Picture show 19
– T.O.C. –
9. Decision – is it worth restoring an onetime bicycle?
Old frames can be re-used to brand great bicycles. Both for commuting, and for recreation. And no, you lot don't need a mount bike to go riding in the woods, in spite of what marketing experts are proverb.
For the ease of maintenance, it's simpler if you conform the frame and then yous can utilise the currently available components (rear hubs, bottom brackets etc.). Of course, there'due south no reason to throw away any quondam parts while they are all the same working. Just make sure, if y'all are investing some fourth dimension and money, that you accept a platform that can be maintained in the long run (then you don't have to "retire" the bike once its bottom bracket bearings vesture out, for instance).
In my stance and experience, steel frames with British standard bottom bracket threads are a perfect candidate for easy restoration, with minimal modifications.
For bikes with sentimental value, don't allow whatever of the to a higher place-noted problems end you! As it is nicely shown in the Story of one wheel, and forty years.
– T.O.C. –
10. Video sit-in of this story
– T.O.C. –
langstonwolleationg44.blogspot.com
Source: https://bike.bikegremlin.com/12333/vintage-frame-modern-parts/
0 Response to "Retro Quill Stem Road Bike"
Post a Comment